Migrate to your Private Repository
This document provides instructions for migrating your BlinqIO Projects to GitHub, Bitbucket, and GitLab.
IMPORTANT
Please note that migration from the BlinqIO Git repository to these platforms is one-way and cannot be reversed or switched later.
For instructions on setting up Git Integration in the BlinqIO app, see Git Integration Setup.
Migrate to GitHub
Copy your repository URL
- For Individual Repositories:
Select your profile picture → Your repositories → Choose your repository.

- For Organization Repositories:
Select your profile picture → Your organizations → Choose your organization → Open the repository.

- Select the green Code button (top-right) → Copy the HTTPS URL.

Example
https://github.com/SapneshNaik/talkjs-examples.git
Get your GitHub username
Select your profile picture → Your profile.
Copy your username (displayed under your name).

Generate a GitHub Access Token
Go to Settings → Developer settings → Personal access tokens (classic).

Select Generate new token (classic).
Set Expiration to No expiration.

Under Select scopes, select repo for full repository access.

Select Generate token.

IMPORTANT
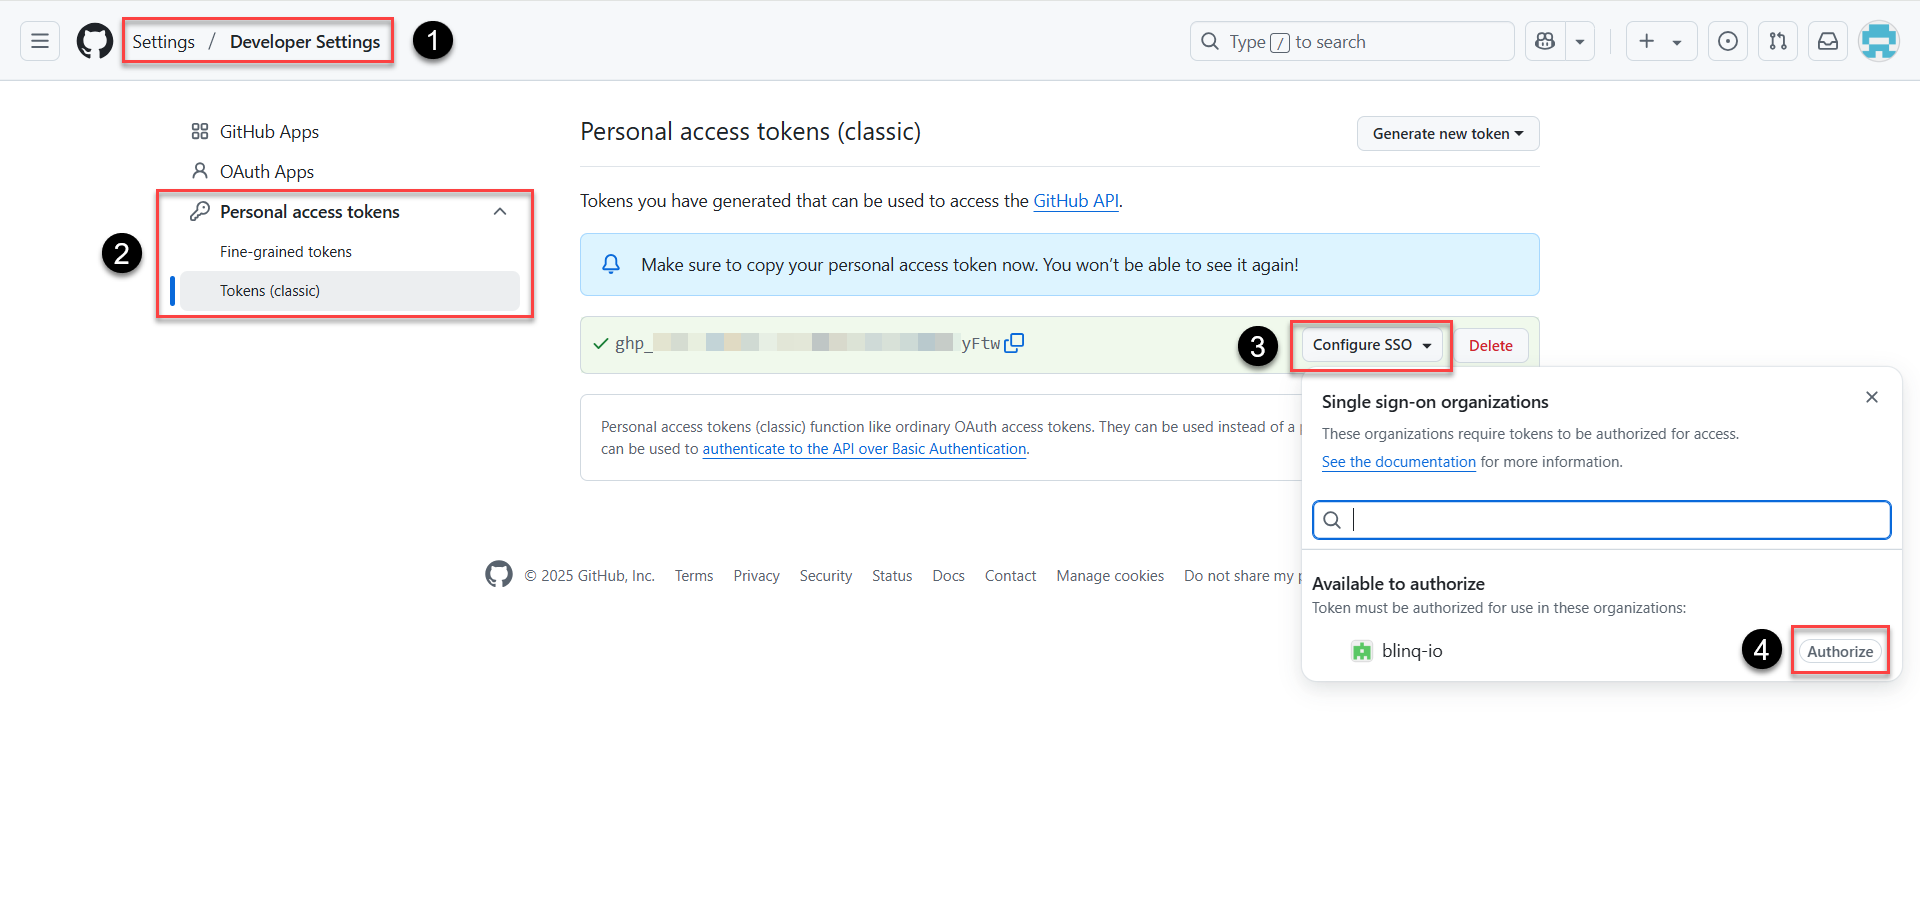
If the repository belongs to an organization with SSO enabled, you must authorize SSO access for the personal access token (PAT).

To authorize SSO:
- After generating the token, go to Settings→ Developer settings → Personal access tokens (classic).
- Find the newly generated token and select Configure SSO.
- Choose your organization and select Authorize.

CAUTION
If you don't authorize SSO, migration to a private organization repository will fail with this error:
json
{"status":false,"error":"Error creating project with private repo"}Migrate to Bitbucket
Copy your repository URL
For Individual Repositories:
Sign in to Bitbucket.
Select Repositories (top header) → Choose your repository.

Navigate to the Source tab (left sidebar).
For Workspace Repositories (Organization Repositories):
Select your profile picture (top right) → Choose your workspace.
Select Repositories (top header) → Choose your repository.

Select the Clone button (top-right) → Copy the HTTPS URL.

Example
https://your-username@bitbucket.org/workspace-id/repo-name.git
Get your Bitbucket username
Select the cog icon ⚙ (top right) → Personal BitBucket settings.
Your username appears under Account settings → Bitbucket profile settings.

Generate a Bitbucket App Password
Select the cog icon ⚙ (top right) → Personal BitBucket settings.
Go to Access Management → App passwords.
Select Create app password.

Set the label.
Select these permissions:
Repository: Read & Write
Pull requests: Read & Write
Webhooks: Read & Write (if needed for CI/CD integration)

Select Create.

IMPORTANT
Save the App Password somewhere safe. After you leave the page, you can no longer access the token.
Migrate to GitLab
Copy your repository URL
For Personal Repositories:
Sign in to GitLab.
Select Projects (left sidebar) → Choose your repository.

For Organization Repositories:
Select Groups (left sidebar) → Choose your group.
Navigate to the repository you want to copy.

Select the Code button (top-right) → Copy the HTTPS URL.

Example
https://gitlab.com/username/repo-name.git
Get your GitLab username
On the left sidebar, select your avatar.
Copy your username (displayed under your name).

Generate a GitLab Personal Access Token
On the left sidebar, select Settings and select Access tokens.
Select Add new token.

In the Token name, enter a name for the token.
Set the Expiration date to 1 year from today.

Change Select a role to Owner.

Select the read_repository and write_repository scopes.
Select Create personal access token.

IMPORTANT
Save the access token somewhere safe. After you leave the page, you can no longer access the token.
